
Views: 0 Author: Site Editor Publish Time: 2026-10-01 Origin: Site


Imagine hauling a fully loaded commercial trailer down a steep mountain grade. Suddenly, your primary air line ruptures. The vehicle's fail-safe mechanism immediately engages due to the sudden loss of pneumatic pressure. This massive pressure drop causes the heavy-duty power spring housed inside the brake actuator to deploy. The wheels lock instantly. This critical safety feature prevents catastrophic runaway situations. However, it also creates a massive logistical headache. It renders towing or repositioning the disabled transport nearly impossible.
The mechanical workaround to this immobile state is a process called caging. Caging is the physical act of manually compressing and locking that heavy-duty coil spring. This action effectively overrides the parking brakes so the rig can be safely moved or serviced. In this comprehensive technical guide, we will walk you through the exact procedures from an engineer's perspective. We will cover the essential hand tools and the non-negotiable safety precautions required to execute this task correctly without risking equipment damage or personal injury.
Safety is Paramount: This procedure intentionally disables the vehicle's parking brake on a specific wheel. Operators must strictly deploy heavy-duty wheel chocks to prevent uncontrolled rolling.
Understand the Mechanism: Caging requires the use of a specialized T-bolt to manually compress the powerful mechanical spring located inside the steel housing.
Emergency and Maintenance Use Only: A caged unit eliminates parking and emergency braking capabilities for that specific wheel end. This procedure is strictly reserved for towing recovery or authorized shop maintenance.
Never Open a Sealed Chamber: The internal coil spring is stored under thousands of pounds of compressive force. Personnel should only use the designated caging bolt to retract it. You must never attempt to disassemble or cut the sealed steel housing.
To grasp the manual release procedure, one must first understand the dual-chamber design prevalent on most commercial rear axles. Standard heavy-duty setups utilize a tandem system known as a Type 30/30 brake chamber. This unit consists of two distinct sections. These are the service brake section and the spring brake section.
The service section is located closest to the axle. It relies on regulated pneumatic air pressure from the foot pedal to apply the brakes during normal driving. Conversely, the spring brake section utilizes a massive mechanical coil spring for parking and emergency braking. Under normal operating conditions, constant system air pressure holds this heavy spring back. When air pressure drops below a critical threshold of roughly 60 PSI, the air is evacuated. The spring then violently expands. This action pushes the pushrod outward to lock the brake shoes against the drum. For fleet managers looking to maintain these complex pneumatic systems, sourcing reliable heavy-duty brake components is essential for long-term highway safety and regulatory compliance.
In mechanical terms, caging serves as a manual override for the pneumatic fail-safe system. It is the physical process of pulling back and locking the deployed power spring using a dedicated caging stud or T-bolt. By manually threading this bolt into the internal pressure plate and tightening a nut against the exterior housing, the operator mimics the force of the air pressure that normally restrains the spring. Consequently, this action retracts the pushrod. It releases the brake shoes from the braking surface and allows the wheel to rotate freely once again.
Recent commercial transport safety reports indicate a massive industry crackdown on pneumatic system compliance during roadside inspections. Fleet operators are facing heavy penalties for air leaks and out-of-adjustment pushrods. Consequently, the transportation sector is rapidly transitioning toward fully sealed, tamper-proof brake chambers. Modern engineering now favors units featuring epoxy-coated power springs and heavy-duty 8-gauge steel housings. These design upgrades eliminate the risk of internal moisture contamination and premature rust.
Furthermore, the shift towards long-stroke designs, typically offering a 3.0-inch stroke length, provides a larger margin of error for brake adjustment. For fleet managers, adopting these advanced sealed units means significantly reduced vehicle downtime and fewer CVSA violations. Understanding how to safely handle and cage these modern, high-pressure pneumatic systems during shop repairs or emergency recoveries has never been more critical.
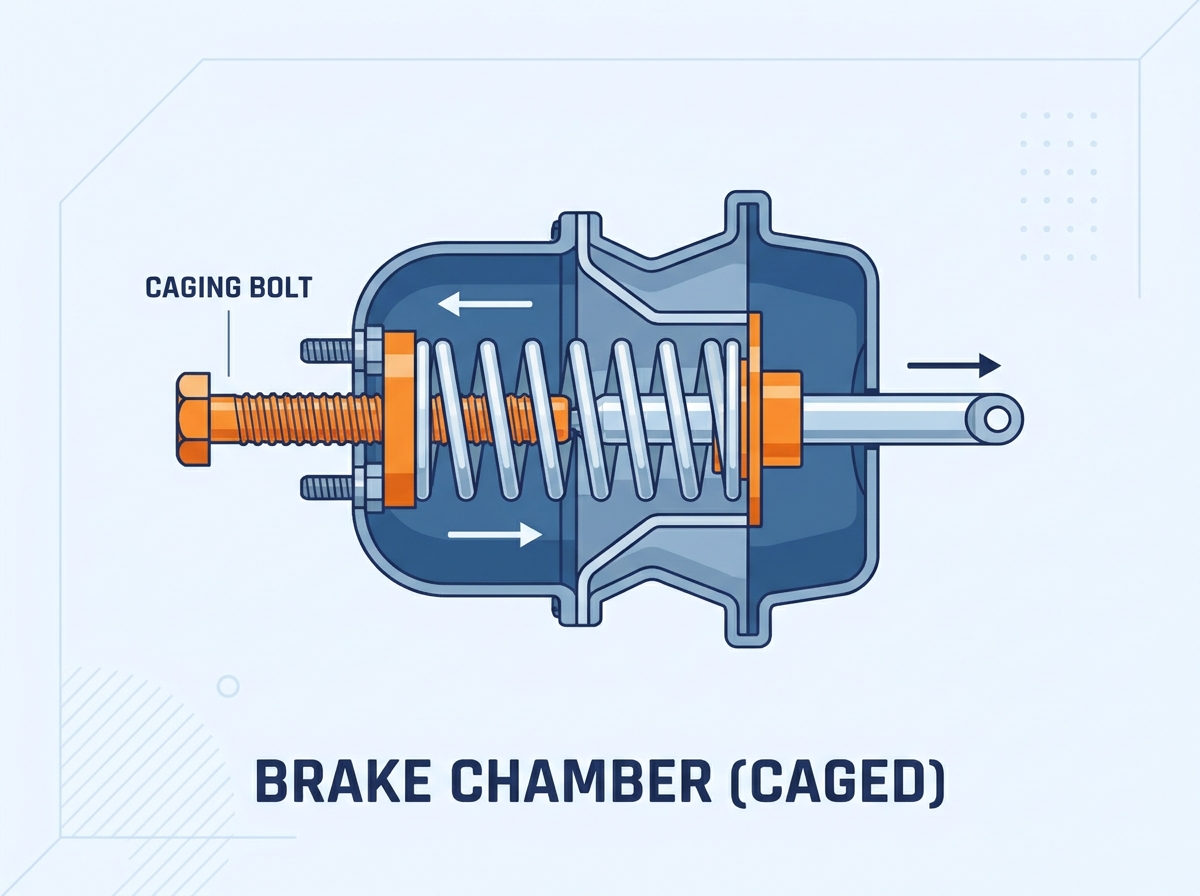
The most common scenario requiring a mechanic to manually release the brakes is a catastrophic loss of pneumatic pressure. This system failure can occur due to a burnt-out air compressor, a ruptured primary air line, a frozen air dryer valve, or a severe leak in the holding tanks. When the system cannot maintain the minimum required pressure, the spring brakes lock automatically. If a fully loaded rig is stranded in a busy intersection, caging becomes the only viable method to move it to a safe shoulder.
Tow truck operators and heavy-wrecker drivers frequently encounter locked axles during recovery operations. When a semi-truck must be towed, the wrecker cannot always supply continuous air pressure to the disabled unit's braking system. Dragging a heavy-duty vehicle with deployed spring brakes would quickly destroy tire treads and cause severe driveline damage. Manually compressing the springs ensures the rear axles are entirely free-rolling during transport. This simple step saves thousands of dollars in secondary equipment damage.
Beyond roadside emergencies, diesel technicians routinely cage these units to perform undercarriage maintenance safely. Whether a mechanic is replacing worn brake shoes, installing fresh slack adjusters, or swapping out the entire assembly, the stored energy of the spring must be neutralized. Failure to do so could result in the pushrod unexpectedly actuating while a technician's hands are near dangerous pinch points.
The primary component required for this procedure is a specialized threaded rod featuring a T-shaped head, a flat washer, and a hex nut. Fortunately, most modern heavy-duty actuators are manufactured with this tool stored directly in a cast-in pocket on the side of the external housing. If you find this hardware missing or heavily corroded due to road salt, you must source reliable replacement hardware before attempting the job.
To operate the bolt effectively, specific manual hand tools are required. A standard 3/4-inch combination wrench or a 3/4-inch deep socket paired with a half-inch drive ratchet is the industry standard for Type 30/30 units. It is absolutely critical to avoid using pneumatic or electric impact wrenches. Their violent torque can easily destroy the internal aluminum pressure plate.
Industrial-grade rubber, urethane, or steel wedge blocks are non-negotiable safety items. Because this procedure eliminates the vehicle's ability to hold itself in place, reliable wheel chocks must be firmly kicked under the tires to prevent unintended rolling.
The most severe hazard during this mechanical procedure is unintended vehicle movement. Once the unit is successfully caged, that specific wheel becomes completely free-rolling. It possesses zero stopping power. Before sliding under the chassis, operators must chock the wheels on the flattest, most stable surface available. Place chocks tightly against the front and rear of the tires on an axle that will not be serviced.
The mechanical coil housed inside a standard Type 30 spring section stores up to 3,000 pounds of compressive force. This immense stored energy is highly dangerous. Technicians must never attempt to remove, loosen, or strike the clamp band that holds the sealed housing together. Tampering with the band can cause an explosive release of the spring. This will result in catastrophic injury.
Crawling beneath a commercial chassis exposes mechanics to falling dirt, corrosive brake dust, and sharp metal components. ANSI-rated safety glasses are mandatory to prevent eye injuries from rust flakes dislodged during the wrenching process. Specifically, heavy-duty leather or synthetic work gloves will protect your hands from severe pinch points along the undercarriage.
Begin by assessing the surrounding terrain. Ensure the truck or trailer is parked on the most level ground available to minimize gravitational pull. Take your heavy-duty wheel chocks and wedge them snugly against the front and rear of the tires that will remain actively braked. Give the chocks a firm kick to ensure they are seated deeply into the tire tread. Verify that the vehicle cannot shift forward or backward.
Slide safely under the vehicle on a creeper and locate the actuator on the affected wheel end. Inspect the side of the cylindrical steel housing. You will typically notice a distinct cast-in pocket covered in road grime that holds the assembly. Unthread the nut, remove the washer, and slide the T-bolt out of this storage slot. Wipe off any excess dirt and inspect the threads to ensure they are not stripped.
Direct your attention to the center of the rear spring housing. You will find a rubber or plastic dust cap securely fitted into the access hole. Use a flathead screwdriver or your fingers to pry this plug off. Set it aside in a clean, safe location. It must be reinstalled later to prevent internal contamination from road moisture.
Take the T-bolt and insert the T-shaped head directly into the center access hole where the dust plug was removed. Push the bolt straight in until you feel it pass through the opening in the internal pressure plate. Once fully inserted, apply slight inward pressure and give the bolt a quarter-turn. Pull back slightly on the bolt. You should feel a distinct metallic click as the T-head locks firmly into the receptacle slot of the pressure plate.
With the bolt securely locked internally, slide the flat washer over the exposed threaded end of the rod. Next, thread the hex nut onto the bolt. Spin the nut down by hand as far as it will go. Ensure the washer sits completely flush against the flat base of the steel housing.
Grab your 3/4-inch hand wrench or deep socket and begin tightening the hex nut in a clockwise direction. As you turn the wrench, the bolt will slowly pull outward. This manually compresses the heavy internal spring. You will physically see the pushrod on the opposite side retracting into the housing. Continue tightening until the brake shoes visibly clear the brake drum. Typically, this requires exposing roughly 2.5 to 3 inches of thread. Stop tightening as soon as you feel firm resistance to avoid warping the internal plate.
Once the towing recovery is complete or the mechanical repairs have been finalized, the unit must be released to restore normal parking brake functionality. Before you even touch the wrench, the vehicle's pneumatic system should ideally be pressurized to at least 100 PSI. Supplying air to the system forces the spring back mechanically. This takes the extreme tension off the caging bolt and makes the nut significantly safer and easier to turn.
With the system pressurized and the spring held back, use your hand tools to loosen the hex nut by turning it counterclockwise. Unthread it completely until it reaches the end of the bolt. Remove the nut and washer. Push the T-bolt slightly inward, give it a quarter-turn to unlock the T-head from the pressure plate, and pull the entire assembly straight out of the access hole.
Never leave the tool loose in a toolbox where it can be easily lost. Immediately return the T-bolt, washer, and nut to the external storage pocket on the side of the housing. Finally, firmly press the rubber dust plug back into the center access hole. This small plug is vital for keeping rain, road salt, and debris out of the internal mechanisms. It prevents internal corrosion that could lead to premature failure.
One of the most frequent and destructive mistakes operators make is using pneumatic or battery-powered impact wrenches to tighten the nut. High-torque power tools spin the nut far too quickly. This generates excessive friction that causes thread galling. More importantly, the violent hammering action can strip the threads entirely or punch the steel T-bolt straight through the internal aluminum pressure plate. This permanently destroys the unit.
Mechanical principles dictate that the spring only needs to be compressed far enough to release the brake shoes from the drum. Technicians sometimes mistakenly believe that tighter is better. Over-tightening the nut beyond the manufacturer's recommended distance applies unnecessary stress to the internal components. Excessive force will deform the pressure plate, warp the external housing, or snap the bolt under extreme tension.
Failing to reinstall the center dust plug after completing the job is a subtle but critical oversight. Leaving this access hole open provides a direct path for water and corrosive road chemicals to enter the spring housing. Over time, this leads to severe internal rust. It weakens the power spring and ultimately causes a catastrophic structural failure of the braking system while the vehicle is in operation.
Brake chambers are robust heavy-duty components, but they are not immune to the harsh realities of highway driving. If a unit cannot hold air pressure, or if the internal spring mechanism is compromised by corrosion, it cannot be repaired in the shop. It must be replaced entirely as a sealed unit. Fleet managers must prioritize safety by sourcing parts that meet strict DOT and industry manufacturing standards.
When selecting a replacement, upgrading to a premium sealed design offers significant long-term value. For instance, selecting units with a 3.0-inch long stroke and a maximum operating pressure of 150 PSI ensures your fleet exceeds current safety margins. To clarify the differences, review the comparison table below.
Specification / Feature | Standard Aftermarket Chamber | Premium Sealed Chamber |
|---|---|---|
Housing Construction | Standard steel, prone to denting | Heavy-duty 8-gauge steel, impact resistant |
Corrosion Resistance | Basic paint coating | Epoxy-coated internal springs, premium powder-coated exterior |
Stroke Length Options | Standard 2.5-inch stroke | Available in 3.0-inch long stroke for better adjustment margins |
Maintenance & Downtime | Higher risk of internal contamination and failure | Tamper-proof sealed design significantly reduces roadside violations |
To ensure long-lasting performance and regulatory compliance, professionals should upgrade their braking systems using premium hardware. You can explore a comprehensive catalog of high-quality brake chambers that deliver exceptional durability and precise engineering for all commercial heavy-duty applications.
Understanding the manual release procedure is an indispensable skill for heavy-duty truck drivers, tow operators, and diesel mechanics alike. The mechanical process itself is relatively straightforward. You insert the T-bolt, lock it into the pressure plate, and tighten the nut. However, the safety implications of this task are massive. Always remember that a manually compressed unit provides absolutely zero parking brake resistance. This makes your heavy-duty wheel chocks the most important tool in your arsenal.
By meticulously following this step-by-step guide, strictly avoiding power tools, and respecting the immense stored power of the internal coil spring, you can safely manage pneumatic air brake emergencies. Keep your commercial vehicle maintenance operations running smoothly and safely. If your fleet requires immediate upgrades or reliable replacement parts, we highly recommend exploring the extensive inventory at commercial vehicle parts to find the exact specifications tailored to your heavy-duty requirements.
Absolutely not. Operating a rig with a caged unit means that specific wheel end possesses zero parking or emergency braking capability. It is strictly a temporary, emergency measure meant for safely towing a disabled vehicle or moving it a very short distance at low speeds into a mechanical repair bay. Driving on public roads in this condition is highly dangerous, illegal, and violates strict commercial vehicle safety regulations.
You do not need massive amounts of torque to properly secure the system. You should only use manual hand tools, such as a standard 3/4-inch combination wrench or a ratchet. Stop tightening the nut once the pushrod has fully retracted and the brake shoes have visibly cleared the drum. Over-tightening with excessive force can strip the bolt threads or permanently fracture the internal pressure plate.
On most modern heavy-duty air brake actuators, the caging bolt or T-bolt, along with its flat washer and hex nut, is conveniently stored in a designated cast-in pocket. This holder is located directly on the exterior side of the steel housing.
If the specific tool is missing from the housing, you cannot safely perform the manual release. It is highly recommended for commercial drivers and mobile mechanics to carry spare bolts in their truck's toolbox. They are inexpensive, readily available, and standardized to fit most common Type 30 30 commercial units.
Under no circumstances should you attempt this. The mechanical power spring inside is compressed under thousands of pounds of lethal force. Attempting to open, cut, or remove the sealed clamp band can result in an explosive mechanical release. This will cause severe injury or death. Always replace the entire sealed unit if it fails to function correctly.
For an experienced diesel technician or tow operator with the correct hand tools, the process typically takes between 5 to 10 minutes per wheel end. However, severe rust or a damaged access hole can extend this time. Always prioritize safety over speed when working under a heavy-duty chassis.
Yes, the entire purpose of this manual procedure is to compress the power spring when the vehicle has lost pneumatic air pressure. While having air pressure makes the job easier by taking tension off the nut, using a hand wrench to manually draw the bolt outward is the standard method for recovering a vehicle with a completely dead air system.
